Part 1: Prerequisites
Let's get setup shall we?
First things first you're gonna need to download a few bits and bats (I'm going to assume you have Visual Studio C++ 2013 installed [2012 will do, but it will differ somewhat], the SDL specific "bits and bats" I will take you through). Now...
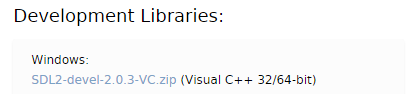
SDL2 Development Library
Go - here - and download the Development Library for Windows, for Visual C++
SDL2 Development Library
Go - here - and download the Development Library for Windows, for Visual C++
I'll tell you how to set that up in a moment.
SDL2 Image
Go - here - and download the SDL2 Image Extension Library for Window, for Visual C++
SDL2 Image
Go - here - and download the SDL2 Image Extension Library for Window, for Visual C++

With that done, we're ready to go ahead and install those two with Visual Studio.
[Note: You will have to do this every time you set up a new project so remember it and remember it well, or you'll be visiting this page often]
Library Setup (SDL2 and SDL Image)
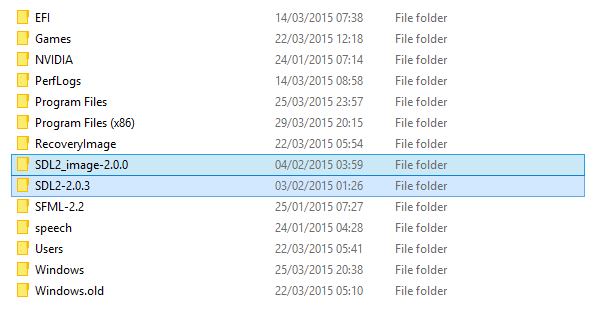
Now we've got them downloaded you're going to want to extract them. Now choose your location carefully because it depends on 2 things...
If you're going to be developing on more than one PC you can either install SDL2 and SDL Image on every PC you work on, or you can install it on a portable hard drive or USB stick (4GB min, for future proof purposes). If you install it on a portable hard drive, the only issue you will ever come across is if your hard drive/USB stick's drive letter (E:, F:, etc..) changes, but if that ever does happen, you can change the include paths in the project (we'll come to that later). So choose a good place, which if you're only developing in one place the C: drive would be your best option (in with Program Files and Windows etc.) and extract each zip folder's contents there, so you should have this somewhere on your PC/Hard Drive/USB stick:
[Note: You will have to do this every time you set up a new project so remember it and remember it well, or you'll be visiting this page often]
Library Setup (SDL2 and SDL Image)
Now we've got them downloaded you're going to want to extract them. Now choose your location carefully because it depends on 2 things...
If you're going to be developing on more than one PC you can either install SDL2 and SDL Image on every PC you work on, or you can install it on a portable hard drive or USB stick (4GB min, for future proof purposes). If you install it on a portable hard drive, the only issue you will ever come across is if your hard drive/USB stick's drive letter (E:, F:, etc..) changes, but if that ever does happen, you can change the include paths in the project (we'll come to that later). So choose a good place, which if you're only developing in one place the C: drive would be your best option (in with Program Files and Windows etc.) and extract each zip folder's contents there, so you should have this somewhere on your PC/Hard Drive/USB stick:
Once this is done we can start setting up our project.
SDL2 Project
First thing's first, open Visual Studio (if it asks you for a development environment, choose C++, if not don't worry about it). You're going to want to go to "File" -> "New..." -> "Project" or press Control+Shift+N and you'll get this window:
SDL2 Project
First thing's first, open Visual Studio (if it asks you for a development environment, choose C++, if not don't worry about it). You're going to want to go to "File" -> "New..." -> "Project" or press Control+Shift+N and you'll get this window:
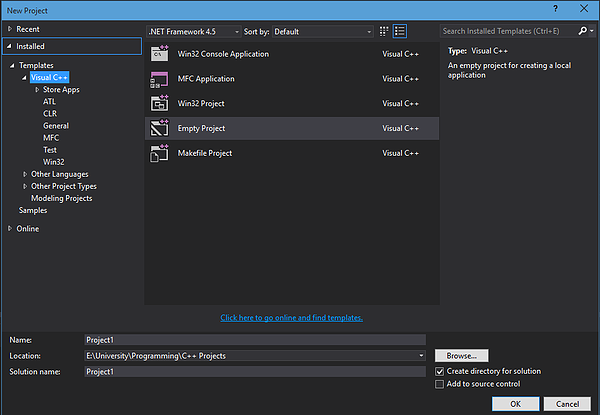
Yours will either look the same or with a few more options on the left. Expand "Visual C++" on the left using the arrow next to it (if it isn't already expanded like mine is) and single-click empty project. At the bottom of the window, give it a name (I would suggest something like "sdl-game-practice"), choose a location to store your project, which if you plan to develop on more than one PC then I would store it on a portable hard drive or USB stick with at least 4GB of space, preferably 8GB (just incase for some reason your project becomes huge... gotta leave room for error). If not, the default is perfectly fine or anywhere else of your choosing.
Once we've got our empty project you should see 4 folders on the left with nothing in them. Yes? Perfect. Now, right click on the name of your project [not the solution] and click properties right at the bottom. You'll get a window like this:
Once we've got our empty project you should see 4 folders on the left with nothing in them. Yes? Perfect. Now, right click on the name of your project [not the solution] and click properties right at the bottom. You'll get a window like this:
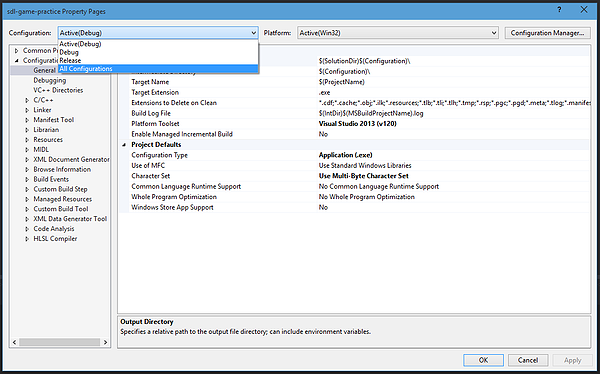
Click on the dropdown shown in the above image and choose "All Configurations" otherwise you'll have issues when it comes to releasing your game.
Next step, navigate to "C/C++" -> "General":
Next step, navigate to "C/C++" -> "General":
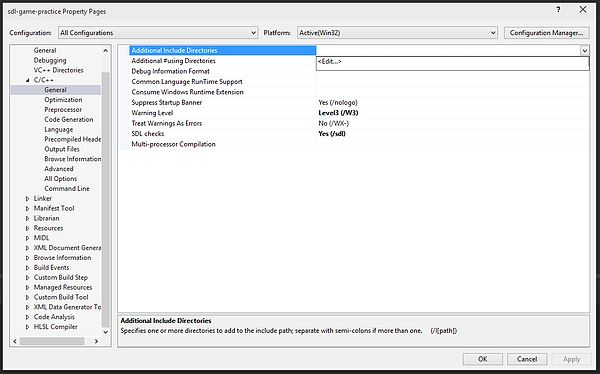
As in the above image, click on "Additional Include Directories", a dropdown will appear on the right, click it, then double click "<Edit...>":
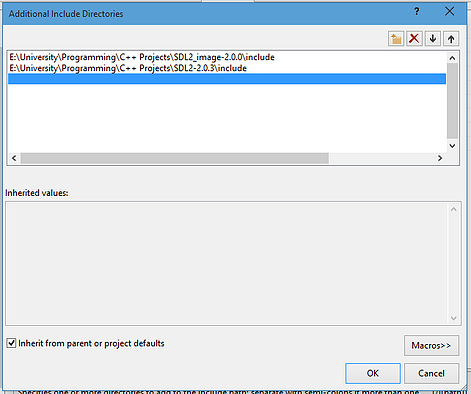
Yours won't have the two path files mine does, so let's fix that. Click the 1st button of 4 in the top right to add a new include path and click the button with three dots that pops up. In the file window which pops up, navigate to the place where you stored your SDL2 and SDL Image libraries. For the two folders repeat the following process:
Go into the folder -> into "include" -> click "select folder" in the bottom right.
Like I said, repeat for both SDL2 and SDL Image.
Once done, click OK and then apply in the main properties window. Navigate to "Linker" -> "General" like so:
Go into the folder -> into "include" -> click "select folder" in the bottom right.
Like I said, repeat for both SDL2 and SDL Image.
Once done, click OK and then apply in the main properties window. Navigate to "Linker" -> "General" like so:
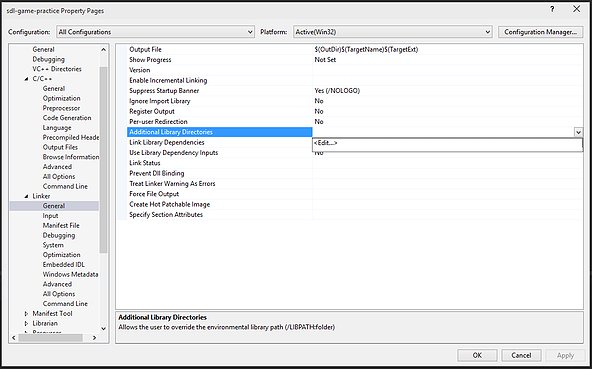
Again, click on the "Additional Library Dependencies" box and click on the drop down that appears, then click "<Edit...>", a similar box to the include box will pop up.
Repeat the process from the include box with the file paths, except instead of the "include" folder, go into the "lib" folders and from there into the "x86" folders of each library (SDL2 and SDL Image) and "select folder" once more. Click OK, then apply. Next navigate to "Linker" -> "Input":
Repeat the process from the include box with the file paths, except instead of the "include" folder, go into the "lib" folders and from there into the "x86" folders of each library (SDL2 and SDL Image) and "select folder" once more. Click OK, then apply. Next navigate to "Linker" -> "Input":
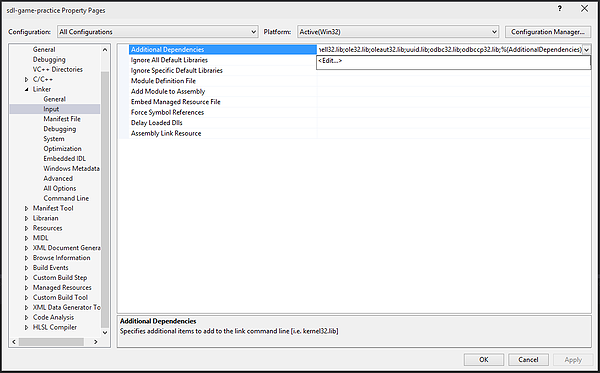
As with the previous two, click on "Additional Dependencies" click the drop down that appears on the right and click "<Edit...>". In the box that appears simply copy + paste the following:
SDL2.lib
SDL2main.lib
SDL2_image.lib
Click OK, and apply. Finally, navigate to "Linker" -> "System":
SDL2.lib
SDL2main.lib
SDL2_image.lib
Click OK, and apply. Finally, navigate to "Linker" -> "System":
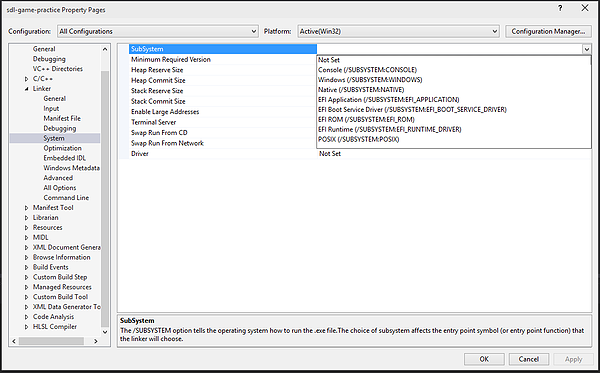
For "SubSystem" click on the dropdown on the right as before, and choose "Console", should be the first option. Then, on the dropdown that says "All Configurations" at the top on the left, click it and choose "Release". Then repeat the action for SubSystem, instead choosing "Windows" this time. Click apply, the OK and you're all setup, ready to start developing in C++ with SDL2 and little bit of help from SDL Image 2.0
See you in the next part where we start to establish the ground work for our game!
See you in the next part where we start to establish the ground work for our game!
